Till now, I have been using cordova date picker plugin for all date and time user inputs in the jarme app. There are many other packages/libraries that provide this feature for the web but since we only released jarme for mobile devices, the cordova package was more than enough and actually the best fit given how it had device specific styling and all. But as soon as ionic team released the datetime component, there really was no more excuses to use another cordova dependency. So I removed the plugin and implemented the picker as soon as I could. The documentation is stellar and it just works!
Problem
The component itself is nicely done, covers edge cases, looks pretty and smooth. However, it allows very little control over the component’s behavior since everything is encapsulated. I was trying to get the picker to display when an icon is clicked but for the life of me, I couldn’t find any way to hook into the component and trigger it on demand, programmatically. Also, I found one poor soul (at the time of writing this post) over here who also got stuck trying to do the same. So, I looked under the hood and tried to figure out a workaround. Here it is -
Work around
Seeing how the component has a nice open() method, I thought there must be a way that I can invoke that on demand. Turns out angular makes it quite easy to do. All you have to do is, have a way to refer to the component and then use that reference in your controller method to fire the .open() method. Let’s say you have a component of your own where you want to launch a date picker when an icon is clicked, and then take the selected date and display it in a modified way instead of using the datetime component’s view.
awesome-compo/awesome.html
<ion-col (click)="datePicker.open()" width-50>
	<ion-icon name="calendar"></ion-icon>

	<div>
		{{ selected.toDate() | amDateFormat:'DD' }} {{ selected.toDate() | amDateFormat:'MMM' }}, {{ selected.toDate() | amDateFormat:'YYYY'}}
	</div>

	<ion-item no-lines hidden="true">
		<ion-datetime  #datePicker
			text-center
			(ionChange)="dateChanged($event)"
			displayFormat="DD MMM, YYYY"
			[(ngModel)]="date"></ion-datetime>
	</ion-item>
</ion-col>
Notice a few things here -
- The
<ion-datetime>component has a reference id#datePickerand it hashidden="true"which basically tells ionic to keep the datetime component hidden at all time. - There is a div with the date on display that uses a couple of pipes to format the date.
- There is a click event handler for the entire content including icon and the formatted date. When clicked anywhere within the column, we will fire
datePicker.open()to show the datetime component.
Now let’s take a look at the component’s controller class that does the magic.
awesome-compo/awesome.ts
import {Component, ViewChild} from '@angular/core';
import { DateFormatPipe } from 'angular2-moment';
import * as moment from 'moment';

@Component({
	templateUrl: './awesome-compo/awesome.html',
  	pipes: [ DateFormatPipe ]
})
export class AwesomeCompo {
	private selected: any = moment();
	private date: any = moment().toISOString();

	@ViewChild('datePicker') datePicker;

  	dateChanged(date) {
  		const { day, month, year } = date;
  		this.selected.year(year.value).month(month.text).date(day.value);
  	};
}
So where’s what we are doing -
- Using angular2-moment package to format the date display.
- Using moment.js to easily parse and manipulate js dates.
@ViewChild('datePicker') datePicker;will make sure thatdatePickeris a accessible within the class and the view as a reference to the datepicker component. Which is why we can access the component’s.open()method.- When user sets a date using the picker, the
dateChanged(date)method will fire. We take the values and update ourselecteddate variable with the new date.
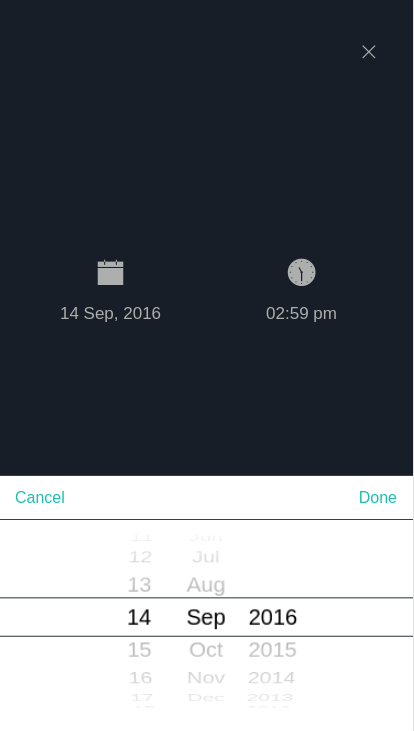
Here’s a preview of how it looks like in jarme -
Take away
Ionic team is doing an amazing job shipping all these cool components and features and I hope these little work arounds won’t be needed anymore in the future as it matures and gets out of beta. Until then, peeking under the hood is a very efficient way of getting yourself out of a hole.